![[CESCG logo]](../..//CESCG/images/cescg98.small.gif)
StepÃn Kment
xkment@cslab.felk.cvut.czComputer Graphics Group
Czech Technical University
Prague, Czech Republic
![[CESCG logo]](../..//CESCG/images/cescg.small.gif)
|
|
Local Navigation Systems
StepÃn Kment xkment@cslab.felk.cvut.czComputer Graphics Group Czech Technical University Prague, Czech Republic |
|
Experience with VRML - building interactive world
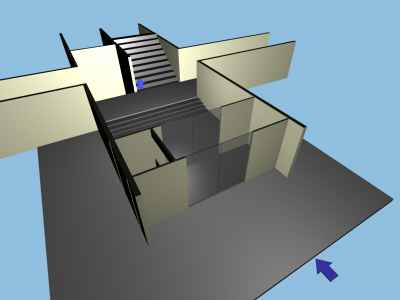
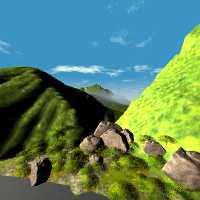
Example: Final VRML scene
| VRML nodes can be found in 3DS MAX in following location: | 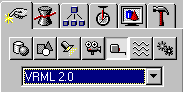 |
| ...and this is a list of available helpers: | 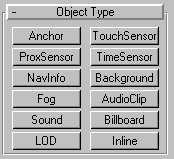 |
How to setup VRML player's NavigationInfo node
 |
NavigationInfo
|
Rendering of the 3D scene is a very processor-intensive task and without appropriate hardware acceleration even very powerful machine (for instance Pentium II / 266 MHz with Matrox Millenium II 2D graphics adapter I have been working on) can't render larger scenes in more than 10fps in a small window (full-screen is absolutely unusable). That is why we need to optimise our VRML world.
Turning collision detection off
Collision
{
collide FALSE
children [...]
}
Because we defined animation paths with care in 3DS Max, we don't need to worry about collisions with walls or other objects. So it is very useful to turn off the collision detection, we again save lots of CPU time. Just copy entire scene into the children field of this grouping node and set field collide to FALSE.
Text
{
string "TEXT"
fontstyle{
family "SANS" #face of the font
size 20 #size of the font in space
}}
I did not manage to export text object from 3DS Max dierctly. The problem is that one can, of course, create text in 3DS Max as a 2D shape extruded to 3D, but when one exports this object, he or she gets large list of vertices and faces. Max simply can't (at least this version of export plug-in) export Text node and replaces it with extremely large list - the text is then defined as any other complex object. I found simple, but still not perfect, workaround. First place the box or some other primitive in the Max's scene where the text should be and give it name - for instance TEXTBOX. Export the scene to the VRML file and load that file in text editor. Now search for TEXTBOX word. You should see something like this:
| DEF TEXTBOX Transform { translation 0 0 0 rotation 0 0 0 0 scale 1 1 1 children [ Transform { translation 0 0 0 children [ Shape { appearance Appearance { material Material {diffuseColor 0.6 0.8941 0.6} } geometry Box { size 173.9 60.87 85.02 } } ] } ] } |
now replace geometry field of the Shape node with the TEXT node:
| Shape { appearance Appearance { material Material {diffuseColor 0.6 0.8941 0.6} } geometry Text { string "TEXT!!!" fontStyle FontStyle {family "SANS" size 30} } } |
Now there should be your text somewere around the previous place of the box. But it can be rotated or translated, also experiment with size field of FontStyle node. The only advantage is that the text object is somewhere around the place, where it should be. Of course, do NOT use export of font objects directly from 3DS Max, numbers of faces and vertices would increase catastrophically.
Examples: Box | Replaced text
How to build "navigation web" in the scene
This is very important part of scene design. If navigation works badly or doesn't work at all, the system becomes unusable because the user interface is hidden. First we need to decide, where we can go in the scene and each place should be linked to the others at least in one direction. Connections are built in 3DS Max using standard free cameras.
| Create TouchSensors - buttons, which start the animation. At first place one button (I use blue arrows rotated to the direction of next movement) per one camera somewhere around its start position. Under the panel Create/Dummies/VRML2.0 you can find TouchSensor object - put these objects close to the buttons you have just created - one sensor per one button - and set their properties: First pick the trigger - the button object, then pick the action object - the camera. Keep the sensor enabled. Now is basic animation finished, if you set in the VRML player appropriate viewport and click the button, you should be navigated through the scene. But we still need to improve logic of the scene and by clicking the button we have to also set the viewport as current one. |  |
Export the scene into the VRML file and load the file into the editor. We must add
some ROUTE directives to the file. Each path between two nodes must consist of these
nodes:
The example above is a code generated for a camera named Camera01. There is set initial viewport posiotion, TimeSensor (generates timer events for the camera animation), Position and/or Rotation interpolator with large list of key values (is responsible for definition of position of the camera in space and time), button shape grouped with TouchSensor (responsible for sending the start event). Routes link all these elements together. First one sets the start time of timer and activates it, second passes periodic events from timer to interpolator, calculated new position of the camera is then passed to the camera object. We need to hang another route to the first event of the TouchSensor. When one comes to some node, there is still set old viewport. We need to set new viewport, otherwise the viewport would be animated but we would be looking into the scene through different one. Just add this line: ROUTE TouchSensor01-SENSOR.isActive TO Camera01.set_bind Now when the sensor is clicked, it sends one message of boolean type to the camera object and the camera is bound as the current viewport.
|
Now we have created basic navigation, we can refine it a bit. Note that the WRL file is now changed and any export from 3DS Max to this file would overwrite the changes!
| It is not necessary to have all the start buttons visible everytime. We can use LODs to hide them. In 3DS Max there is another VRML helper called LOD. Create it near the button and pick the button. Now click on the line with button's name and set the distance - you can see a blue sphere painted in the scene. If one comes inside the sphere, the button becomes to be visible. Next, pick another object (for instance some box) and set its distance bigger than button's (if only one object exists in LOD's list, the LOD node is not exported because it would be useless). Now export the scene and wiev the WRL file. There should appear LOD node in the text. In children field you should first find the button object grouped together with the TouchSensor, then another node you picked as the second object - delete this object and put Group { } instead. Now copy whole LOD node to the final WRL you got in previous step instead of previos button node. The result is very simple - the button is hidden until user navigates to the node button belong to (or passes by in the near distance). |  |
Buttons can change their colors when are clicked. To do this, we must add
a script node:
and two new routes (we suppose TouchSensor for this button is DEF-named "TS" and material node (note: not the Shape node!) of the button is DEF-named "ButtonMaterial":
When the sensor is clicked, it sends the message to the script and the script generates new event and recolors the button. The script is necessary because of the type conversion - we convert SFBool (boolean value) to SFColor (color RGB representation). One can catch boolean values incoming to RecolorIn function and can change the color of the button only in the moment when the button is actually pressed:
ROUTE TS.isOver TO MyScript.RecolorIn |
Adding real views of the scene
VRML2 supports technology QuickTime VR (first introduced by Apple Inc.). It is based on a very simple idea: the user is put in the centre of big sphere, from where he can not move to the surface of the sphere. On the sphere there is painted surrounding area and because it is not displayed in stereovision, it is realistic vision of the scene.
The environment rendered by VRML browser consists of up to six unique pictures, which show surrounding scene from front, left, right, back, top and bottom (it is not necessary to define all six pictures, for instance we can define only four side pictures and leave top and bottom unset. These pictures can be generated using special 3D modelling tools or one can create them using special software and snapshot or videocamera.
 |
 |
 |
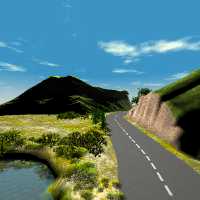
Examples: Environment 1 | Environment 2 | Cylindrical environment
Adding pictures and texture maps
Important objects should be mapped with textures or at least painted with the different color. Mapping of the surface is done in 3DS Max as normal definition of the object's surface, diffuse map is exported to VRML file. It is also possible to add special partially transparent pictures - it is the only reasonable way how to add flowers or even trees in the scene. For this task we have to have pictures exported in PNG or GIF format with defined transparency. For instance in Adobe Photoshop, transparent colors are set in export plug-in GIF89 export as selected colors of no more than 8-bit palette. In 3DS Max this information is not used for rendering, but in VRML players interpret it correctly. It is also possible to use tiling of the map on an object, so if client computers are powerful, we can snap wall and floor in the building, scan the pictures and map these pictures in the model; because of tiling, these maps can be quite small and then repeated on bigger objects.
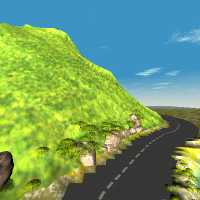
Example: Final VRML scene
