Before we start implementing a real-time solution for enhancing character
movement, we take a look at related topics to fully understand the
implementations coming next chapter.
2.1 Skeleton Animation Systems
Beside the mesh 3d-data representing the character, a skeletal animation
system consists of a series of hierarchical transformations which
represent bones. Like a real bone in a human body they influence the
shape of the skin. Only the bone data needs to be stored for every
frame of the animation. Usually, the bone data is represented by quaternions
or a transformation matrix. This eliminates the need to store vertex
positions for all the vertices for every frame of the animation, as
in the vertex based animation. We can derive intermediate frames by
using spherical interpolation.
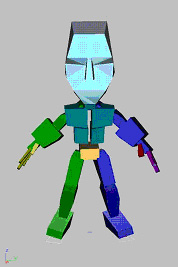
Fig. 1: Schematic skeleton view
Advantages of skeletal animation are the smooth transitions while
changing from one animation to the other. Additionally any number
of animations can be added whereas the mesh remains constant and the
same animation-cycles could be applied to different meshes while conserving
a relative small memory footprint.
2.2 The need for skinning to generate a vertex-hull
Mesh (vertices) or skin is attached to the bones. Now when the bones
move or rotate, the vertices attached to the bone also move or rotate
according to their representative bones.One way of attaching vertices
to bones is by using a single offset per vertex. So every bone tightly
influences a group of faces from the character-mesh.
2.2.1 Single weight vertices & their disadvantages
The following images show the relationship of the skeleton / bone
with its mesh. The semi-transparent object is the mesh. As you see,
they are tightly coupled. When a bone moves, the vertices attached
to it also move [Anderson2001].
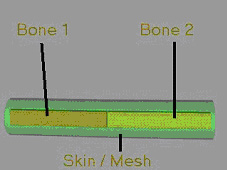
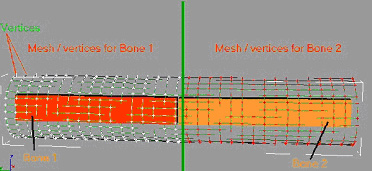
Fig. 2: Schematic bone / skin view Fig. 3: Vertex / bone relation
Fig. 3 shows the same relationship as explained above. The only difference
is that the mesh is shown in wire frame. The green line divides the
vertices between the first and second bone. Vertices are represented
by a small "+" sign. Vertices on the right are marked red
indicating that they belong to the second bone, where as the vertices
on the left are marked white indicating that they belong to the first
bone. The following figure (4) highlights the main drawback of the
skeletal animation system using a single weight per vertex. When rigid
bodies move, the vertices attached to them also move rigidly.
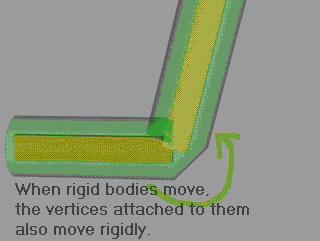
Fig. 4: Single weighted vertex drawback
2.2.2 Multiple weighted vertices for smooth skinning
Introducing multiple weights per vertex improves the smoothness of
the mesh-hull. This process is called vertex blending. This is achieved
by allowing more than just one bone to influence each vertex, effectively
mimicking the way that a bone in the real world would affect the skin
of a living being. Each vertex is given information about which of
the bones in the skeleton influence it and how great the influence
of those bones is (skin weight). What we need is a skin that will
blend smoothly between the rigid joints.
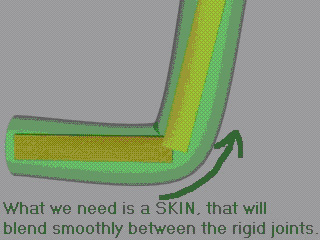
Fig. 5: multiple weights per vertex
Now every vertex is attached to multiple bones with different weights.
This results in a smooth moving skin adapting itself to muscle-bulges
and corners.
The generic blending formula:
vBlend = V1W1 + … + Vn-1Wn-1 + Vn (1.0-Wi)
Here vBlend is the output vertex, Vn the n-th vertex and Wn is the
n-th vertex's weight.
For two, three and four weighted matrices, the above formula becomes:
vBlend = V1W1 + V2(1.0 - W1)
vBlend = V1W1 + V2W2 +V3(1.0 - (W1+W2))
vBlend = V1W1 + V2W2 +V3W3+V4(1.0 - (W1+W2+W3))
Typically, the vertex structure for a blending vertex looks like
this:
2.3 File Format
As mentioned before, the more data is available, the fewer calculations
are required. It is advisable to store only the data on disk that
cannot be generated on the fly by the program. Let's take a quick
look what data has to be stored in a 3D model file to support the
animation of that model:
2.3.1 Skeleton
The data required to store a skeleton for an articulated object, apart
from positional information for its joints itself, is the relationship
between those joints. The easiest way to do this is by nesting the
information for joints of a lower order in the hierarchy just below
the joint which they are supposed to be connected to. For the joints
themselves, all that needs to be known is the relative position of
the joint which occupies the next higher order in the joint hierarchy
of the skeleton. Bones (connections between the joints - vectors pointing
from a joint to that joint's child joints) do not have to be explicitly
saved in the file, as they are implicitly defined by the joints which
they connect.
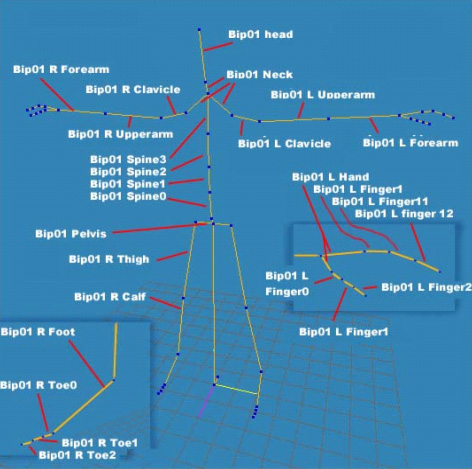
Figure 6: Hierarchic name convention for bones in X-files, exported
from 3D Studio Max™
Each Frame can contain a FrameTransformMatrix, containing local transformations
for that Frame. A Frame can also contain Mesh objects defining the
vertices that form a 3D model, and child Frames.
2.3.2 Skin
The information which has to be stored for the skin of an articulated
object, are the vertices which make up the skin. Each vertex structure
has to contain data regarding the untransformed position of the vertex
itself, the vertex normal, the UV texture coordinates of the vertex
for texturing the model, a list of bones and skin weights, which define
which of the joints of the skeleton are able to influence the vertex
and by how much each of these joints influences the vertex.
2.3.3 Animation Cycles
Usually transformation information for all the joints of the articulated
structure is stored in each key-frame of an animation. In the X-File
format animation cycles are saved in the AnimationSet structure. Within
an AnimationSet one can define a separate Animation for each part
of the model which animates within the time frame of that particular
animation cycle. Each Animation contains an AnimationKey structure
which in turn contains a list of timed key transformations which will
affect the part of the model referenced by the animation[Anderson2001].